Tuesday, May 31, 2011

Summer Ideas to Keep My Kids Busy and Smart

It feels like my kids are the only ones still.in.school! Tomorrow is our last day. Yay! That is going to be fun for like two days and then they are going to sabotage my summer. Which I want to be fun, fun, fun!

My secret weapon is this stack of envelopes.

These envelopes are filled with worksheets, learning games, crafts, reading lists, math activities...you name it! I found several great teacher blogs and homeschool blogs that offered these printables.  I was blown away by what incredible resources are out there!!  Stapled to the outside are index cards with various ideas for crafts, snacks, outings, etc.

My plan:  10 weeks of summer = 8 weeks of themed activities and 2 weeks of vacation. I will keep my kids' academic skills sharp. Sometimes that will mean a computer game. Sometimes a worksheet. Sometimes a crafty activity. I MUST be prepared or the kids will win and I will lose and then my summer will not be fun.


My 8 themes are:
Manners -- Weather --(2wks going on vacay) -- USA -- Ocean & Beach -- Plants and Nature -- Transportation -- Colors -- Geography & Maps


I chose themes that my kids are interested in.  Maybe.  I am just using these "themes" to give me ideas for library books, crafts, snacks, games, outings, and ways to sneak in academics.  One day it's a nature walk...the next week it's a color hunt walk.  I cannot just come up with great mom-ideas on the fly.  You probably are.  I require preparation.  Yes, my brain is gone.  And by the way, my kids are 6 (going into 1st grade), 4 (going to PreK), and 23 months.

Here is a glimpse of what I have planned- next week officially starts "Manners Week".


On the card:
* I will teach them how to set a table, phone manners, safety when we are in stores, address and cell #, be a princess, tea party, discuss feelings and how to handle them, and make plate faces to show different feelings.
* I have a coupon for a free cupcake at a cute bakery...we can dress "nice" and go for a mannerly cupcake and juice.
* I checked out several manners books from the library already. I also have two surprise books that I bought from Scholastic- What Brothers (Sisters) Do Best by Laura Numeroff and Polite as a Princess a Disney book.

What's in the envelope?
** The Exquisite Wedding of Q and U, found here at Growing Kinders; a story about a queen and a quarterback that teaches about the Q and U sounds
** Worksheets for Q and U from BeginningReading.com There are a TON of free worksheets here!
** A Feelings printable found here at 1plus1plus1equals1. Ton of stuff here, too!

  Not to mention, I have two more envelopes of Misc reading and math worksheets that don't really have a theme. BUT, I could incorporate them into any theme. For example, we can learn to tell time because it is polite to be on time. We can learn to count money because it is polite to give your mom money. HAhahaha!

If you need a place to start looking, try these sites:
Confessions of a Homeschooler
First Grader...at Last!
Super Teacher Worksheets
1plus1plus1equals1
Growing Kinders
BeginningReading.com

Monday, May 30, 2011

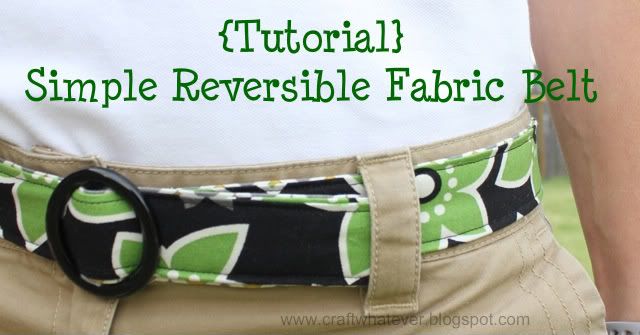
Tutorial: Easy Reversible Fabric Belt for Summer


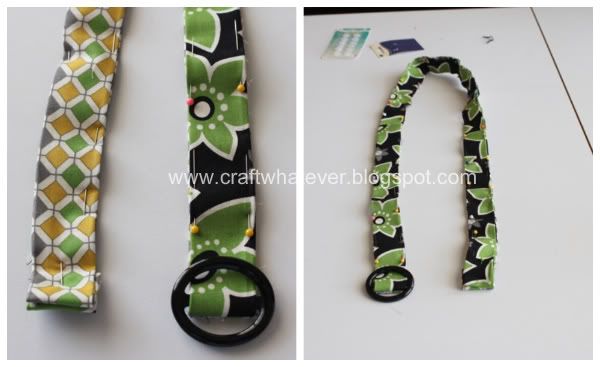
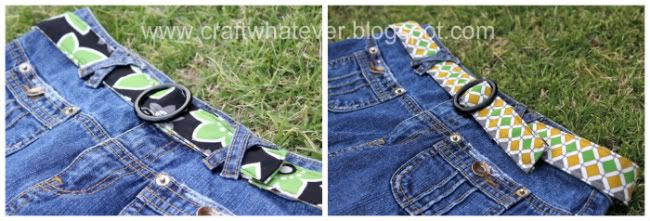
Do you like this belt?  Well, I made it.  And I thought I would share the tutorial with you today!  How's that sound?

You see, I used to have this gorgeous belt, a Vera Bradley belt, but the buckle broke.  I was crushed.  And in need of a new belt.  I had that VB belt for-ev-er!  You see, the Vera belt was a gift, and since I am so cheap awesome at saving money I decided to make a very similar belt for much less moolah.

The original VB belt was very long and I did this double-over thing with the end that I really got used to wearing so I wanted to make a belt similar in construction/size.         (Having said that, I have a couple more belts to share with you later on that address some of the things that bug me about this belt- like the length and thinness.)


Here is my tutorial for a FAST and EASY Reversible Fabric Belt that you can make today and wear in about an hour (or less)!


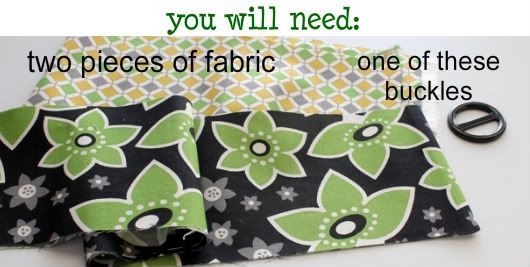
I had trouble finding the buckle in a store.  I found this one at Hancock Fabrics.

Step 1:  Cut your fabrics based on two things- size of the buckle and desired length of your belt.  My old belt was about 42 or so inches long which coincides with the width of my cotton fabric (44" wide).  So I decided to just use the entire width of fabric as my belt length.  For the width, measure the straight bar in the middle of your buckle and multiply that by 4.
My buckle was 1.5" wide x 4 = 6" so I cut each fabric piece to 44" long X 6" wide.

Step 2:  a.  Fold length of fabric in half and press.  b.  Open and fold raw edges to the crease you made in fig. a.  Press.  c.  Fold in half along that first crease and press.
When you get to "c" try, try, try your best to keep the belt 1.5" wide at all parts.  Do this for both fabric pieces.

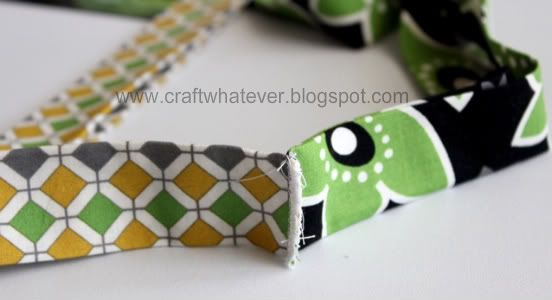
Step 3:  Sew ends with "right" sides together.  I did a few zig zags over the raw edges and a few straight stitches for a clean edge.

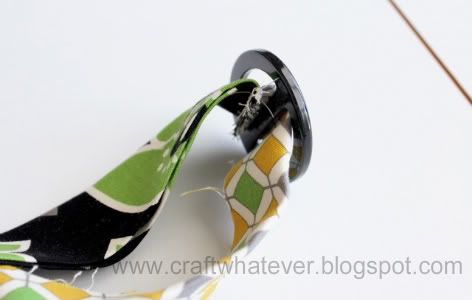
Step 4:  Feed the buckle onto the belt like this:
At this point, if you feel the belt is going to be too long, cut it to size.


Step 5:  Pin the two strips together.
Your strips *should* be exactly the same right?  But in reality, you may have to shimmy them to be even in spots.

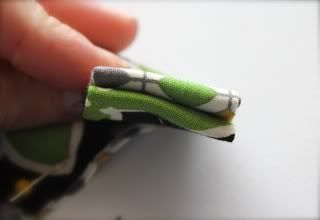
The end of the belt, I just did a simple fold like this:
Then when you sew it together, just tuck in any stray raw edges so they don't stick out.  

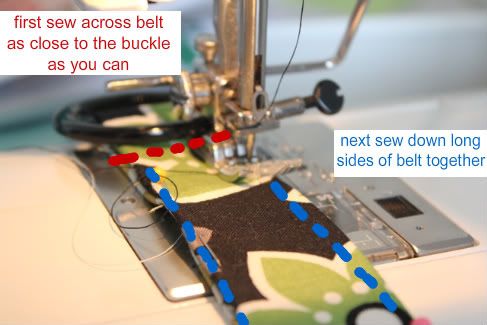
Step 6:  Sew fabric together.  First, sew across the belt near the buckle.  Then edgestitch along each side.  Options here are using different thread color in your bobbin or sew two rows along each edge.  Options only.
I couldn't get as close as I wanted to the buckle.  I might hand sew it later (although I am quite allergic to hand sewing!) or try a different presser foot or just leave it.  I also think I could sew along the edges in this middle area with the entire strip laid out flat before putting the buckle on.  But I really wanted to have a no-fuss solution to my broken belt.  If you have a solution to this could you share your secret with me?  


I do have a couple more belt ideas that I can't wait to share with you!  Perfect for summer!  {yay summer}

That's it!  Now go wear the heck out of your new belt !!!!

Linked up here:
craftBWS tips buttonTodays Creative Blog
and also at Not Just a HousewifeSomewhat Simple

Friday, May 27, 2011

Kitchen Shortcut: Super Fast, No-Mess, Real Deal Chicken Nuggets


A few weeks ago, I showed you how to prep and freeze your chicken. Right? Well, here is one reason why. Now you can make super healthy chicken nuggets. I bet you'll make it this way from now on, too.

My kids like chicken nuggets. They don't love them because they are a meat, and they just can't get into meat. But when I learned that they were more than willing to eat a McNugget...I knew this was my chance!


Here is my kitchen shortcut for:
Super-fast-No-clean-up Real-Deal Chicken Nuggets.
(You are going to thank me for this one.)

You will need:
- Your frozen chicken strips, thawed still in the bag
- Breadcrumbs (any flavor, try plain and add parmesan cheese,  or even crushed cereal)
- Parchment paper on a baking sheet

1. Preheat oven to 375 degrees.

2. Pour a guestimated amount of breadcrumbs into the bag and close it back up. Just dump them in. Don't worry about the liquid in the bag. You can keep this simple and add more crumbs or make this difficult and drain the liquid. Shake bag until the strips are coated with crumbs. Repeat until you are satisfied with the coating.


3. Lay chicken on your parchment paper lined baking sheet. I use tongs or a fork to get the strips out. You don't want to crowd the strips or baking will be uneven and longer. If you have too many just use another pan. Throw bag in trash.


4. Bake at 375 for approximately 15-20 min. I say "approximately" because ovens are all different and chicken done-ness is a preference. My kids won't eat tough, overcooked chicken. But once you find your number, that's the time to set everytime. Of course check them and if they are done (not shiny or pink) take them out.

5. Slide the parchment to a serving dish. Viola!

I hope you enjoy the simplicity of this!

Side note:  I know that this is not the proper way to bread chicken (dredge in flour, dip in egg, roll in crumbs).  I know that.  I have three kids.  I need fast.  Easy.  I have switched to this way because it is not messy and it works. Yes, this is similar to a shake and bake, but the breadcrumbs have less oil and salt.

Thursday, May 26, 2011

All OK in OK

I live in Oklahoma and in case you have not seen the news, about 6 different tornadoes touched down in Okla Tuesday. It was an anxious day.

I am happy to report that we are just fine! No damage to our home either.
Picture from koco.com by ulocal_mobile.

I will add that we were given a heads up about the possibility of a tornado outbreak the day before. So we knew it was possible. I made sure we all had shoes on at 4pm. I felt like I was racing against the clock to make dinner and clean up and get the kids to pee one last time before it was our turn to take cover. I hurriedly flipped pancakes (breakfast for dinner) with a tornado 45 min away. All fed. We did the paper plate thing so kitchen was cleaned up. Garbage out. Cloth diapers in the dryer. Kids had their lovies. This time we actually took our hard drives which containing all of our photos and put them in the shelter ahead of time. We were ready.

See, we are not from Oklahoma. But I knew when I saw Oklahomans getting ready and taking cover that this was no joke. In tornado seasons past, our neighbors stood outside and watched. Some took pictures. Some just joked it up and socialized. But they were usually contemplating the severity of the storm and debating the need to take cover. (We see them when we peek out of our shelter in our garage.)

Finally, the siren went off, we calmly exited the house and promptly shuttled our kids and the three kids next door underground.  Neighbors who have never before in the three years we have lived here, ever asked to use our shelter.  Ten of us nearly filled our storm shelter.

We spent a good bit of time Tuesday evening in our storm shelter. Sitting. Perspiring. Listening. Waiting.

We have been sent to the shelter before, but never when an actual tornado was on the ground and headed right for us! In the past it has been because we were experiencing a storm that looked like it could become tornadic at any moment, meaning it was lowering and rotating but still not on the ground.

We sat with a weather radio tuned into our favorite TV station and listened to the meteorologist pinpoint the tornado's location in between the blaring sirens and the national weather service announcements. We, and our neighbors, sat in our shelter and waited as we heard the words that the tornado was headed our way. The intersections that were identified as next to get hit were those within a 1mi radius of where we sat. We got the hail. It got quiet and still. Then a sudden strong sweeping wind that made the basketball hoop lean, teeter, and pop back upright. Watched a few pieces of debris fly by. Lots of rain. We waited for the "freight train" but it never did come. Thank God!

When we got out of our shelter, there were a few random pieces of debris and leaves in our yard. But essentially nothing had happened.

I found these storm pictures (and the one above) that were taken one block from our house.  One block. They show the tornado starting to fall apart.
Picture from koco.com by yankee214.

Picture from koco.com by shawnteague.

Below:  Two pictures my 6-yr old son took yesterday on our way home from school.
This road is closed because all the telephone poles snapped and fell in the road.

And this is a big tree uprooted at a golf course, 3mi from our house.


In my opinion, we in OKC, had enough warning and time to prepare for the possibility of a tornado. Considering the size and strengths of the many tornadoes our state had, it is a miracle more people aren't dead. (Last time I saw, 8 people were confirmed dead.) But these tornadoes destroyed everything in their paths. They were incredibly strong and violent and far-reaching. One tracked on the ground for 70 miles! The number of survivors is truly a testament to our excellent warning systems and meteorologists we have.

What will be hard to see is Joplin, MO when we drive through that area next month.

Tuesday, May 24, 2011

Too distracted to blog today


I really wanted to show you this belt that I made (and how I made it!), but I am just way too distracted by the weather today to post anything. We are under severe weather warnings and tornadoes are very likely. I just can't concentrate on anything else. So sorry.

Sucks, because I was out of town for the last four days and really wanted to share something crafty today.

Thursday, May 19, 2011

Tutorial: Baby Pants (jeans) with Knit Waistband

IMG_5191

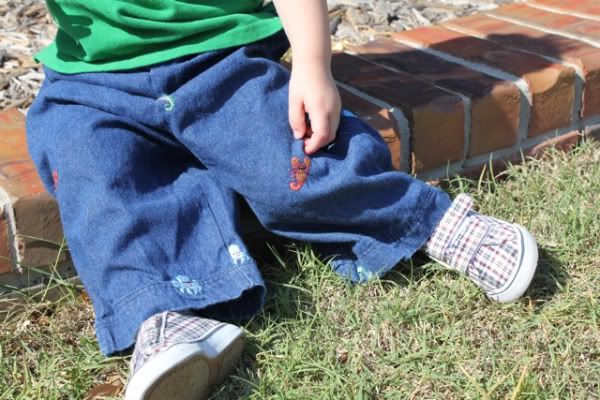
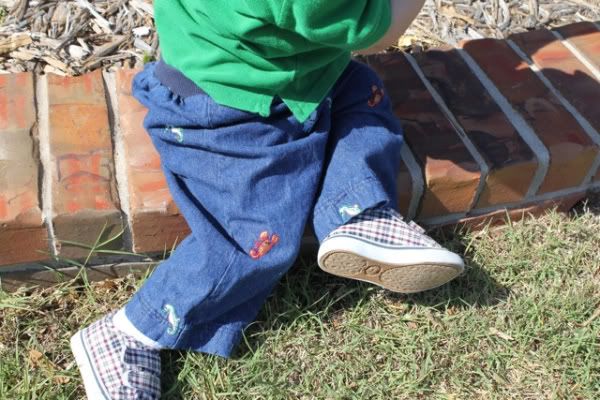
Today I thought I would share how I make baby pants. You see, I HAD to make my youngest some jeans and pants out of necessity. Sure, I have hand-me-down pants for him but they don't fit over his big (and adorable) cloth diaper butt. That's because my hand-me-downs are from my oldest- a skinny boy who wore disposable diapers. These just squeeze my poor baby in the gut when he sits down! Can't have that!

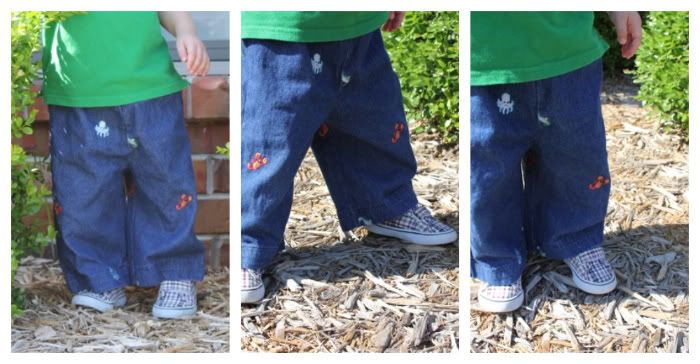
With summer almost here, I thought I would make him some lightweight jeans with a pull-on waist. {Around this house, we call those "eatin' pants"} I chose a very lightweight denim with embroidered sea animals on the fabric. The fabric reminded me of the beach. Which reminded me of summer. So they are still cool, right?

IMG_5184

To make these jeans, I used a pair of baggy pants that fit my son well to make a pattern. There are lots of great tutorials out there if you want to search the web. Or, here, at Made, is a very well written and clear tutorial on how to make your own pattern. Basically you trace existing pants and use that to make new pants. Can you say free?

TUTORIAL:  Baby Pants with Knit Waistband {aka Eatin' Pant}
Supplies you will need:
- Pattern
- Fabric for pants
- Knit or Rib Knit Fabric for waistband
- Elastic
- Pins

--------------------------------------------------------------------------------------------------------------
--------------------------------------------------------------------------------------------------------------
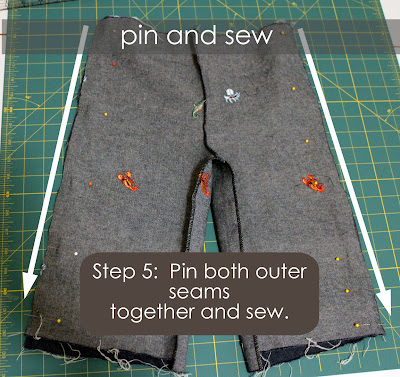
AND sew!  I forgot to say "sew."  You need to also sew inseam.  Start at one hem and keep sewing until you get to the other hem.  One continuous seam.
--------------------------------------------------------------------------------------------------------------
--------------------------------------------------------------------------------------------------------------
--------------------------------------------------------------------------------------------------------------
The elastic and rib knit are going to be about 1 inch longer than the child's waist.  Not sure if my picture was clear on that.
--------------------------------------------------------------------------------------------------------------
--------------------------------------------------------------------------------------------------------------
--------------------------------------------------------------------------------------------------------------
--------------------------------------------------------------------------------------------------------------


Photobucket


This fabric is too cute! With all those whales and lobsters! I got it at Hancock Fabrics and it may still be on sale (it was 40% off!).

Make your kid some Eatin' Pants this weekend!

Tuesday, May 17, 2011

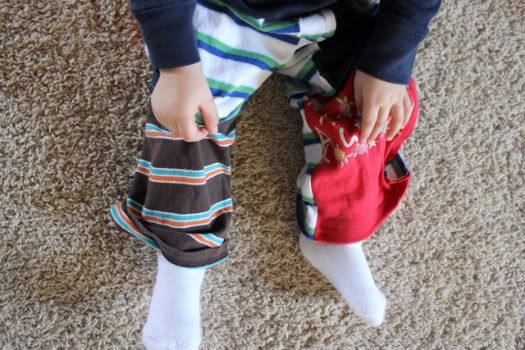
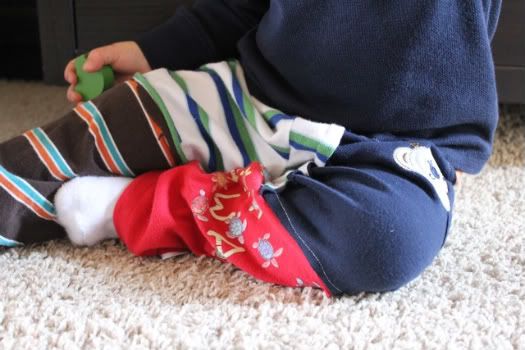
Craft Bucket: Done #17 Kids Pants Pants Pants!

IMG_5001

Finally! I give you pictures that I actually sewed #17 on my Craft Bucket List. This was from a tutorial at Kojo Designs blog. I don't know why, but I didn't exactly follow the directions. I kinda started on them by diving in and sewing up pieces of t-shirt without reeeaally reading their directions on how to do this.

They cut their t-shirts in strips, from probably adult sized shirts.

I used baby/kid old shirt and just cut willy-nilly.  Ooops.

IMG_5003
IMG_5017

Which is fine- except when trying to piece everything together to get a large enough panel from which to cut my pants it got to be a bit more work than it needed to be.  Hence the "oops".

What I did differently (bad and good):
  • I messed up making the rectangle by not using nice, even fabric strips. I did the willy-nilly as previously mentioned. {not intentional- got carried away at project start}
  • I overlapped my pattern pieces so that I would have one full piece for the left leg and one full piece for the right leg (vs. two fronts and two backs). {this was because I screwed up already, see above, and I didn't want even more chaos in the pants}
  • When I made my patchy panel, I lined up pieces that were the hems of t-shirts. So the bottom edge was all hems. Then I laid out my pattern pieces where I thought the hems would be along that pre-hemmed edge. {this was an intentional idea!}
  • I made an elastic waist instead of a drawstring. {had to or my kid would have his drawls around his ankles}
I consider these notes as a "lessons learned".  I had to make them work- I had already cut up all the shirts!


IMG_5010

Yes, they are pretty chaotic, but you know what, the kid LOVES them!

Hoo are you? Hoo am I?

There is a fun linky over at Night Owl Crafting that I have been wanting to try, called "Hoo Are You?". Today I just jumped on in! She posts some questions and then we answer them on our blogs and link back to hers. It's a neat way to e-meet other crafters.
Hereyago!

1. What type of diamond cut do you like?
I am a simple gal, round brilliant cut.

2. If you are married when is your anniversary, if not what month
would you like to be married in?
Anniversary is next week! May 24.


3. What were or would you like your wedding colors to be?
Navy blue- my favorite color. Also had hot pink flowers. It was an impulse decision that I ended up loving.

4. How many bridesmaids did or would you have at your wedding?
We had 7. My 3 sisters, 1 best friend from growing up, 2 best friend from college, 1 best friend from after college. I needed all these gals for guidance. I probably still do!

5. How long have you been married?
8 YEARS next week! WOAH!


I thought this was fun! Hope you did too!
NightOwlCrafting

Share this

LinkWithin

Related Posts Plugin for WordPress, Blogger...